Real Estate Use Case
AI Visual Construction: From Bare Concrete to Dream Home
Buyers commit to properties they can see — not properties they have to imagine. AI visualization turns a concrete shell, a line drawing, an off-plan sketch, or a 3D model screenshot into photorealistic interior images in minutes — giving buyers something real to react to before a single finishing decision has been made.
Projects with comprehensive visualization consistently report 15–30% of units committed before breaking ground. Projects with minimal or no visualization rarely exceed single-digit pre-sales percentages — and often cannot secure construction financing because lenders do not see enough buyer commitment to approve the loan.
This guide covers how AI visualization works at different stages of construction, where it fits in the developer's sales process, what it cannot do, and how to use RogerApp.ai to produce style options fast enough to use in the same meeting where a buyer is sitting.
Key Takeaways
| Point | Details |
|---|---|
| Pre-sales impact | Projects with strong visualization commit 15–30% of units before breaking ground; those without rarely exceed single digits. |
| Financing dependency | Lenders may require 50–80% pre-sales before approving a construction loan — visualization directly supports that target. |
| Speed of iteration | RogerApp.ai produces multiple interior style options in minutes from a photo, sketch, or 3D model screenshot — no 3D software required. |
| What it is and is not | AI visualization shows what a space could look like in a chosen style. It does not produce dimensioned drawings, structural plans, or construction documents. |
The problem visualization solves — and why it matters for financing
Selling a property before it exists is a problem of trust. A buyer committing €200,000–€2,000,000 on a deposit for an off-plan or pre-construction property needs a reason to believe the finished result will match what they agreed to.
Floor plans and blueprints do not bridge that gap. They require technical interpretation that most buyers — and many investors — do not have. When buyers cannot picture what they are committing to, they hesitate, ask more questions, need more meetings, and often walk away.
The downstream effect hits the developer directly. Lenders typically require 50–80% of units pre-sold before releasing construction financing. Every delayed sale pushes the financing timeline. Every unclear finish choice creates costly change orders after construction begins. Real estate image enhancement of unfinished spaces addresses all of this at once: buyers understand what they are purchasing, they make finish decisions earlier, and the developer builds with fewer unknowns.
Three situations where AI visualization works
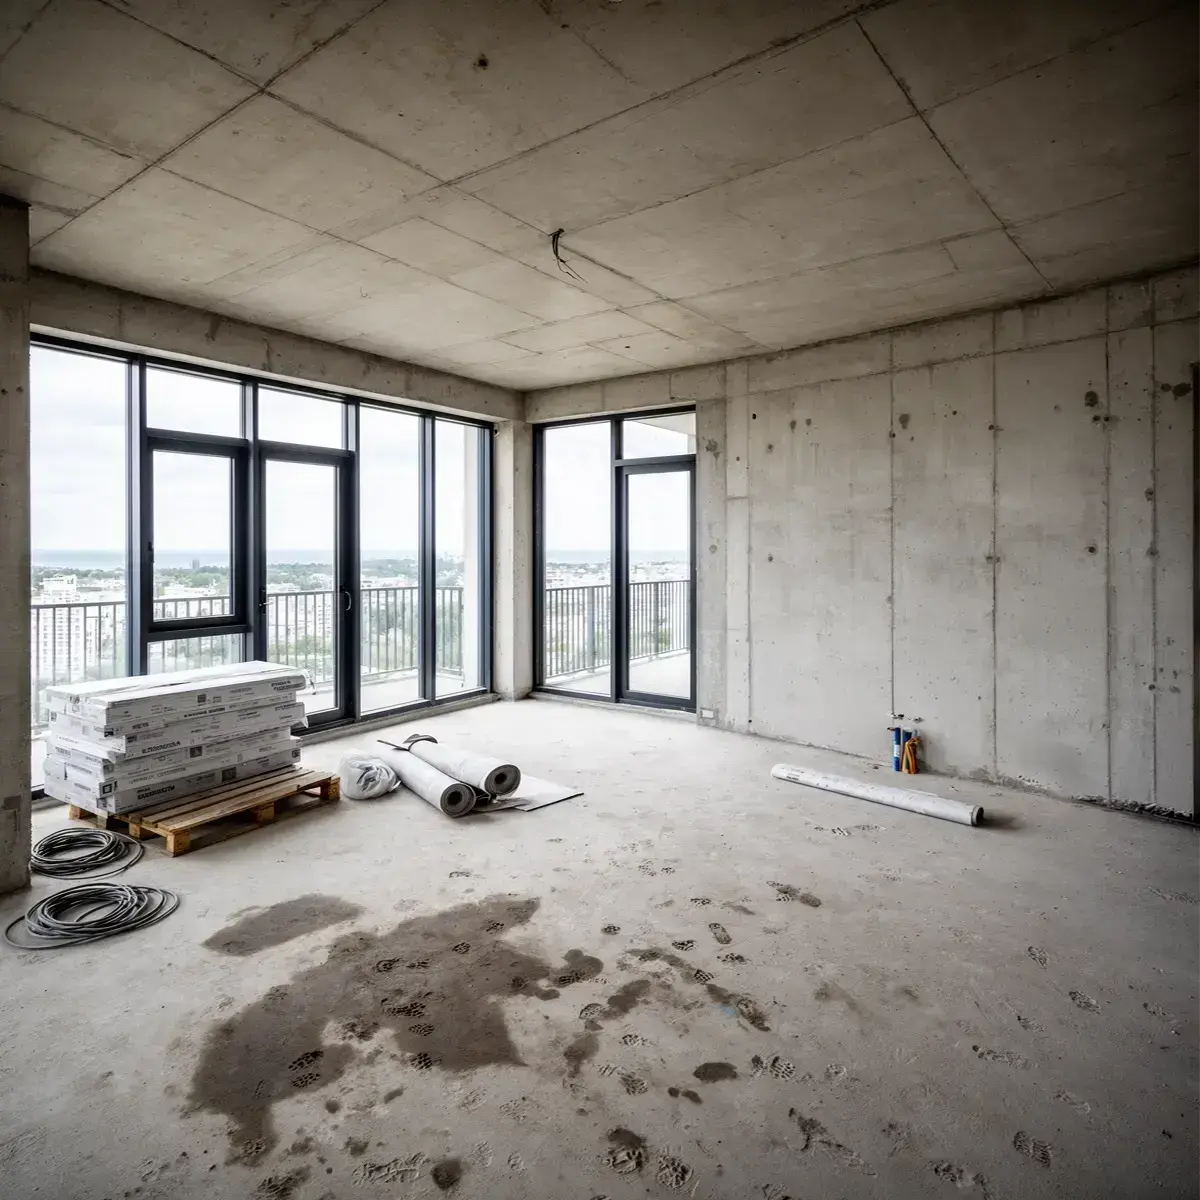
Situation 1 — The shell exists, surfaces are unfinished
The building is up. Concrete walls, bare floors, raw ceiling. There is a real space to photograph — but nothing that communicates warmth, lifestyle, or finish quality to a buyer.
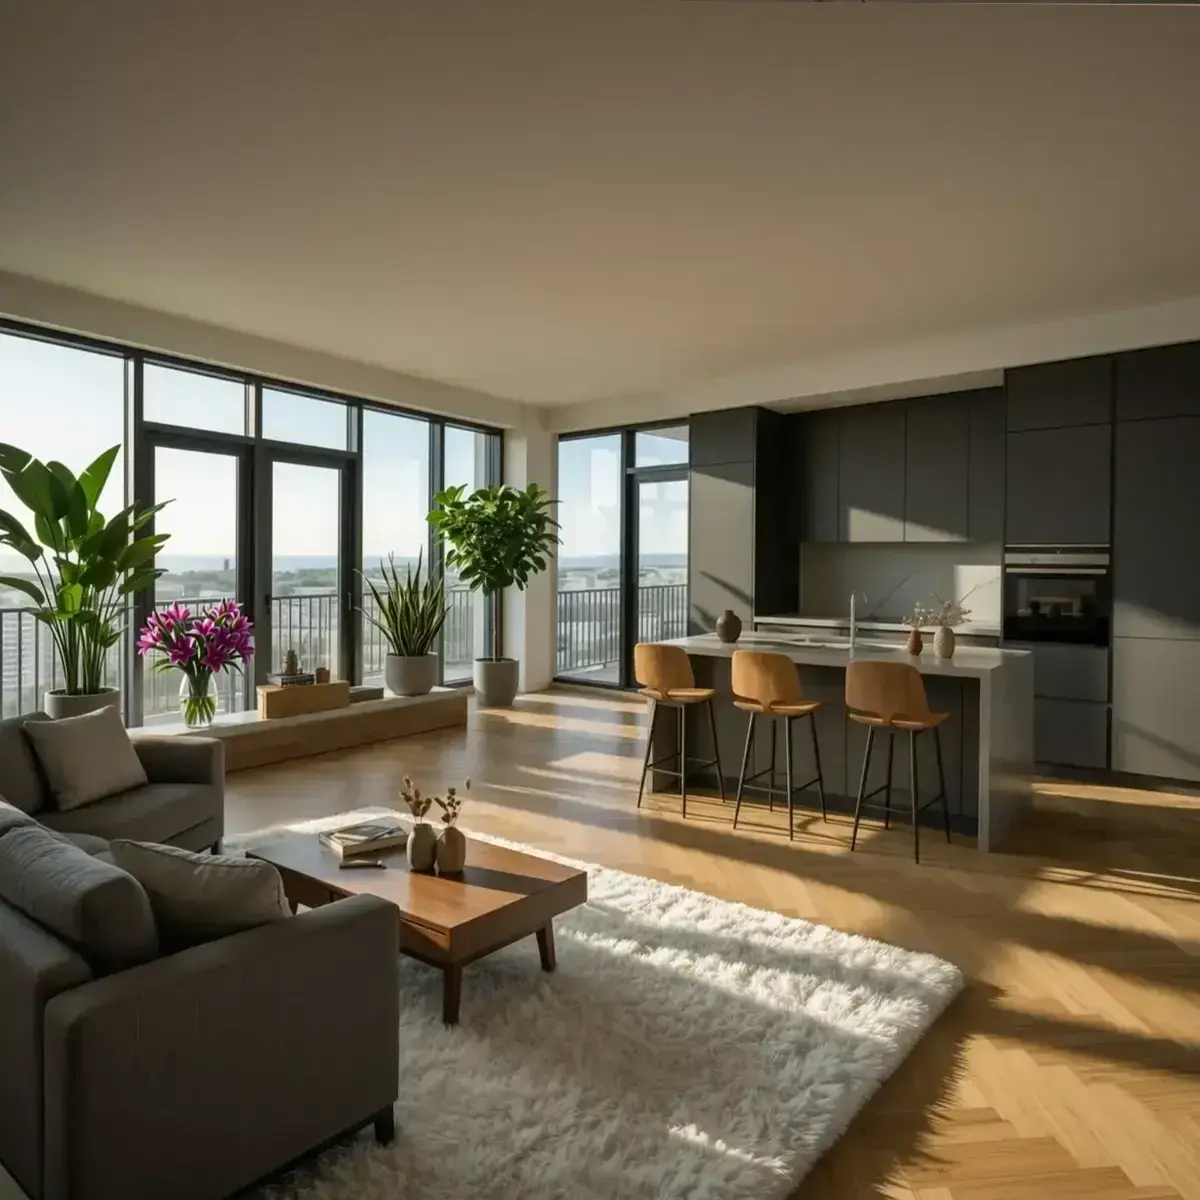
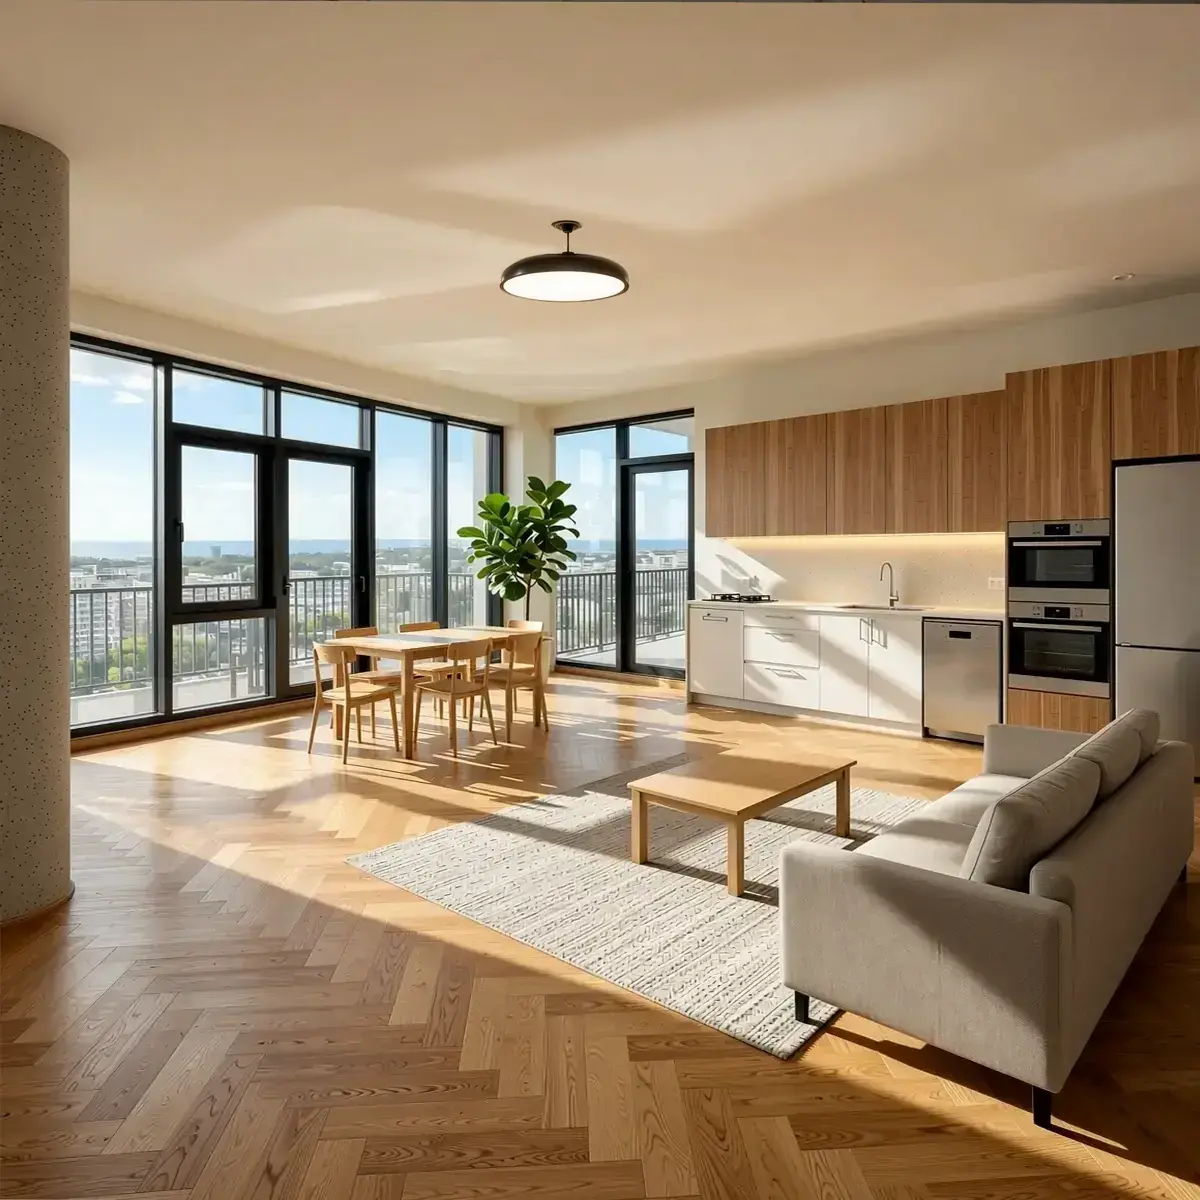
This is the strongest use case for RogerApp.ai. A real photograph of the actual space becomes the source image. AI adds flooring, wall finish, lighting, furniture, and décor — matched to the room's real geometry, windows, and proportions. The result looks like a professional interior photograph of a finished apartment, taken in that specific room.
The buyer sees their future home in the actual space they are buying — not a generic rendering of a similar-looking apartment.
Before visualizing: If the construction site photo contains tools, building materials, or equipment on the floor, remove these first using Manual Masking. Paint over the clutter with the brush tool, remove it, and then run the visualization on the clean image. The output will be significantly more presentable to buyers.
Inputs that work: Any photo of the real space — even a phone photo — in reasonable light. The better the source photo, the more precise the output.
Situation 2 — A sketch, line drawing, or 3D model screenshot
No physical space exists yet. The project is at the concept or planning stage. The developer has sketches, CAD drawings, or screenshots from a 3D model — but producing full photorealistic renders takes days and costs hundreds per image from a rendering studio.
RogerApp.ai's Sketch to Image feature converts line drawings, architectural sketches, and 3D model screenshots into photorealistic images in minutes. Many 3D software tools export views as wireframe or line art — RogerApp.ai converts these directly into finished interior renders. The same applies to hand-drawn sketches: whether you are working from an image to line drawing export, a line sketch from a photo of a physical drawing, or a CAD file screenshotted as a JPG, the input becomes a photorealistic image of a finished interior.
This is not a replacement for a precision architectural render with exact dimensions. It is the step before that: a fast, realistic visual that lets a buyer say "yes, that direction feels right" — before a rendering studio spends three days building the perfect version.
The workflow this enables:
| 1 | Sketch / 3D model screenshot / line drawing |
| 2 | RogerApp.ai — 3–5 style options produced in one session |
| 3 | Buyer picks a direction in the meeting |
| 4 | Rendering studio builds the dimensioned, precise version of that one direction |
This saves significant time and cost at the rendering stage — because the brief is clear before the work starts.
Inputs that work: Hand-drawn sketches, CAD drawings exported as images, screenshots from SketchUp, Revit, Blender, or any 3D software. Photo to line drawing conversions. JPG or PNG format.
Situation 3 — Style and finish options for the buyer to choose from
Buyers — especially those purchasing off-plan — often struggle to articulate what they want until they see alternatives. Showing style options of the same space gives them something to react to instead of a blank brief.
RogerApp.ai produces multiple interior style versions from one source image in a single session. These are examples of directions — the actual range is unlimited, including highly individual and bespoke styles for demanding buyers:
- Scandinavian minimal — light oak, linen, clean lines, natural light emphasis
- Warm contemporary — richer tones, textured surfaces, layered lighting
- Premium dark — dark wood, marble accents, statement fixtures
- Industrial loft — exposed concrete, steel, open ceiling, raw materials
- Japandi — muted palette, natural materials, negative space, low furniture
- Luxury classic — ornate details, rich fabrics, symmetrical layouts
A demanding buyer may want something none of these describe — a specific material combination, a regional aesthetic, or an entirely personal direction. That is exactly the point. Visual communication works in both directions: a buyer who rules out three options in five minutes has given the developer more actionable information than an hour of abstract conversation. When a buyer says "that direction, but lighter floors and no dark ceiling" — that input is specific and buildable. When they say "something modern but warm" — it is not.
The practical value is speed and clarity: the right direction can be identified in a single meeting, before a rendering studio spends days building the wrong version.
What RogerApp.ai produces — and what it does not
This distinction matters and should be communicated clearly to buyers and project teams.
| RogerApp.ai produces | RogerApp.ai does not produce |
|---|---|
| Photorealistic interior images in a chosen style | Dimensioned architectural drawings |
| Multiple style variations of the same space | Construction documentation |
| Marketing-ready images for listings and brochures | Structural or technical plans |
| Buyer-facing visuals for finish and style decisions | 3D models |
| Sales centre presentation images | Planning permission or building permit submissions |
RogerApp.ai visualizations are decision-support and marketing tools. They show direction — the feeling, style, and material mood of a finished space. The value is in speed and iteration: showing a buyer what their apartment could feel like in multiple different directions, in the time it takes to have a coffee.
What it costs — and how it compares
| Option | Cost per image | Turnaround | Best for |
|---|---|---|---|
| Architectural rendering studio | €300–800 | 3–7 days | Final marketing assets, investor packs |
| Dedicated AI render tool | €10–50 | Minutes–hours | Architect workflow, precise geometry |
| Traditional virtual staging service | €15–50 | 24–72 hours | Existing room photos |
| RogerApp.ai | ~€0.49 per edit | Minutes | Style exploration, buyer decisions, sales meetings |
For off-plan and pre-construction properties, AI visualization is often the only practical option for showing buyers what a virtually staged finished space could look like before surfaces exist. Traditional virtual staging requires a furnished or at least finished room — AI visualization works from the shell or the sketch.
The ROI argument for the developer: according to pre-construction marketing data, an $80,000 visualization package on a $150M luxury tower represents 0.05% of project value — less than a single week of construction carry — while potentially driving $30–75M in pre-construction commitments. Fast AI style explorations are a fraction of that investment and happen earlier in the process, before any rendering studio is commissioned.
Frequently asked questions
What is AI visualization for pre-construction properties?
AI visualization converts photos of unfinished spaces, architectural sketches, or 3D model screenshots into photorealistic interior images showing what the finished space could look like. It is used in pre-construction and off-plan property sales to help buyers make decisions before construction is complete.
Can RogerApp.ai visualize a space from a sketch or line drawing?
The Sketch to Image feature converts architectural sketches, line drawings, and 3D model screenshots into photorealistic images. Upload any image — a photo to line drawing export, a 3D model screenshot, or a hand-drawn floor plan — describe the target style and materials, and RogerApp.ai generates a photorealistic version. Multiple style variants can be produced from the same sketch in one session.
Can I use RogerApp.ai for off-plan or pre-construction property marketing?
AI visualization is well suited to off-plan and pre-construction sales. RogerApp.ai accepts line drawings, architectural sketches, 3D model screenshots, and photos of unfinished shells — converting them into photorealistic interior images for listings, buyer presentations, and sales centre materials. Real estate image enhancement at this stage helps buyers commit before construction is complete.
Does RogerApp.ai produce dimensioned drawings or architectural plans?
RogerApp.ai produces photorealistic style visualizations — not dimensioned drawings, structural plans, or construction documentation. The output is a marketing and decision-support image showing what a space could feel like in a chosen finish and style. For building permits, planning approval, or contractor briefings, dimensioned documentation from an architect or 3D modelling software is required separately.
How is this different from a professional architectural rendering studio?
A rendering studio produces a final, precise asset with accurate dimensions and materials — used for investor packs, planning submissions, and final marketing. RogerApp.ai produces fast, photorealistic style explorations for buyer decisions and sales meetings — before the final render is commissioned. The two are complementary: RogerApp.ai clarifies the brief, the rendering studio executes it precisely.
Why does buyer visualization matter for financing?
Lenders typically require 50–80% of units pre-sold before approving a construction loan. Every pre-sale requires a buyer who can picture what they are committing to. Photorealistic visualization of unfinished or unbuilt spaces directly supports the pre-sales pipeline that unlocks construction financing.
What inputs does RogerApp.ai accept for visualization?
Any JPG or PNG image: photographs of real spaces including unfinished rooms, hand-drawn sketches, CAD drawings exported as images, line drawings, or screenshots from 3D modelling software including SketchUp, Revit, and Blender. Phone photos of construction sites work as source images.
Can the same space be shown in multiple finish styles?
One source image produces multiple style versions by changing the prompt. The same concrete shell can be visualized as Scandinavian minimal, warm contemporary, premium dark, industrial loft, or any bespoke direction — including highly individual styles for demanding buyers — in the same session. The range of possible styles is unlimited.
Is AI visualization accurate enough for sales materials?
When the source photo or sketch has reasonable quality and the prompt describes specific materials and lighting, the output is photorealistic and suitable for sales listings, buyer presentations, and brochures. Label images clearly as visualizations — they represent a design direction, not a guarantee of the finished specification.
How to do it in RogerApp.ai
Method 1 — From a real room photo (shell or unfinished interior)
- If the photo contains site clutter — tools, materials, equipment — remove these first using Manual Masking before visualizing
- Upload the clean room photo to the Photo Editor
- In the Requested Change field, describe the style and materials: "Transform this bare concrete room into a warm contemporary apartment interior — light oak herringbone floor, white plaster walls, concealed ceiling lighting, linen sofa, oak dining table, large windows with sheer curtains, professional interior photography quality"
- Process and review — regenerate with different style descriptions for alternatives
Prompt tip: Describe in order — floor, then walls, then ceiling, then furniture. This follows how the eye reads a room and produces more coherent results.
Method 2 — From a sketch, line drawing, or 3D model screenshot
- Export or photograph your sketch, line drawing, or 3D model view as a JPG or PNG
- Upload to the Photo Editor
- Describe the target style: "Transform this architectural line drawing into a photorealistic interior — Scandinavian style, light pine floor, white walls, large windows, soft daylight, furnished living room with low sofa and round coffee table"
- Generate 2–3 style variants by changing the style description each time
Prompt tip: Include the wall material you want to suggest — plaster, brick, timber — and the lighting condition — morning light, golden hour, overcast studio. These two details shift the mood significantly.
Method 3 — Multiple style options for buyer selection
- Upload the same source image (photo or sketch)
- Run separate prompts, each describing a different style direction
- Download all versions and present side by side in your sales meeting or buyer portal
The buyer picks a direction. You have a specific brief. The next step — whether a precision render or a construction finish schedule — starts from a shared understanding instead of a vague description.
Go deeper: RogerApp.ai tutorial
These tutorial sections cover the exact techniques used in this workflow:
-
Sketch to Image — transform drawings into professional images →
Upload a hand-drawn sketch, architectural line drawing, or 3D model screenshot and transform it into a photorealistic image. Works with rough drawings, line art, and exported CAD views. -
Manual Masking — remove site clutter before you visualize →
Construction photos often contain tools, building materials, or equipment on the floor. Paint over these with the Manual Masking brush and remove them before running the visualization — the output will be significantly cleaner and more presentable to buyers. -
How to write effective prompts →
The prompt formula for describing spaces — material, lighting direction, style mood, and what to keep unchanged. The positive-form principle that makes visualization prompts significantly more accurate. -
Fix and upgrade lighting →
Construction site photos often have flat or mixed lighting. Correct before visualizing for significantly better output quality. -
Reverse Mask — protect what exists, change everything else →
When a room already has finished elements — a window frame, flooring, a built-in feature — Reverse Mask protects those while the rest of the room is visualized in the new style. -
Super Resolution — upscale before presenting →
Increase output image quality to 2400×2400 pixels before using in print brochures or large-format sales centre displays.